|
| HST Data Handbook for WFPC2 | ||||
|
|
1.2 Getting Data with StarView
1.2.1 Downloading and Setting Up StarView
The latest version of StarView runs under versions 1.2.2 and later of Java and may be downloaded from
http://starview.stsci.edu.This site also includes a FAQ page and news on releases and updates. StarView will automatically update itself to the latest version, so users do not have to worry about additional installations. Following its installation on computers running Unix and Linux, begin StarView by typing
> StarView
at the system prompt. Under Windows and MacIntosh systems, StarView will appear as an icon. The StarView session then begins, first with an Information window explaining navigation within StarView, and a request for the user to specify an object name resolver (SIMBAD or NED) for use in HDA searches. The first-time user are asked to supply their e-mail information in order to allow StarView to communicate the results of its attempts to retrieve the files requested from the HDA. This e-mail information includes the user's SMTP host, or the computer from which e-mail messages are routed. If unsure of your SMTP host, ask your system administrator. These queries can be turned off for future sessions once this information has been supplied.
1.2.2 Simple Use of StarView
We now proceed to an introduction to the use of StarView. A more detailed description of its capabilities is provided at the web site above, which should also be consulted for more advanced topics such as its Table Exportation and Cross-Qualification functions.
The basic function of StarView is to enable the user to first search the HDA (and the other mission archives in MAST) for data files matching criteria such as object name, position, or proposal number, then allow the user to navigate through the set of files matching those criteria, and finally to let the user retrieve some or all of the files found in the search. Several options for the type of search that can be performed (e.g. by a particular instrument) will be discussed later.
The design of StarView is similar to that of a Web browser. At its top are pull-down menu bars including File, Searches, and Help. The Help menu offers links to documents including the StarView FAQ page. Beneath these menu bars is a row of buttons that run StarView's basic functions, such as searching, marking files for retrieval, and previewing images. A Help button allows users to display pop-up windows describing the function of the different StarView buttons and windows, by first clicking the Help button, then the item of interest. Beneath the row of buttons is the Qualifications table, which is displayed when a search is begun. It consists of several cells corresponding to the search parameters the user wishes to use, e.g., object name, proposal I.D., or instrument. Below this window will appear the Results table, displaying the datasets found to match a given set of search parameters entered into the Qualifications table. For the purpose of introduction, we will describe the use of the most basic search option, called "Quick Search," which can be started by clicking the "Quick" button at the top left of StarView.
As an example of the use of the Quick Search option, we will request all available WFPC2 data for the galaxy M87. This is done by typing "WFPC2" and "M87" in the Instrument and Target Name cells of the Qualifications section, then clicking the "Search" button at the top left of the StarView window. The results of the search will then be displayed in the bottom panel of StarView, as shown in figure 1.1. These results include the dataset name, instrument name, R.A. and Dec of the target, and the instrument aperture used. Note that these parameters could also have been specified in the Qualifications section, as can other parameters including proposal I.D. number, proposal P.I. name, and image central wavelength (corresponding to particular instrument filters or gratings).
Figure 1.1: Results of StarView Quick Search for WFPC2 files of M87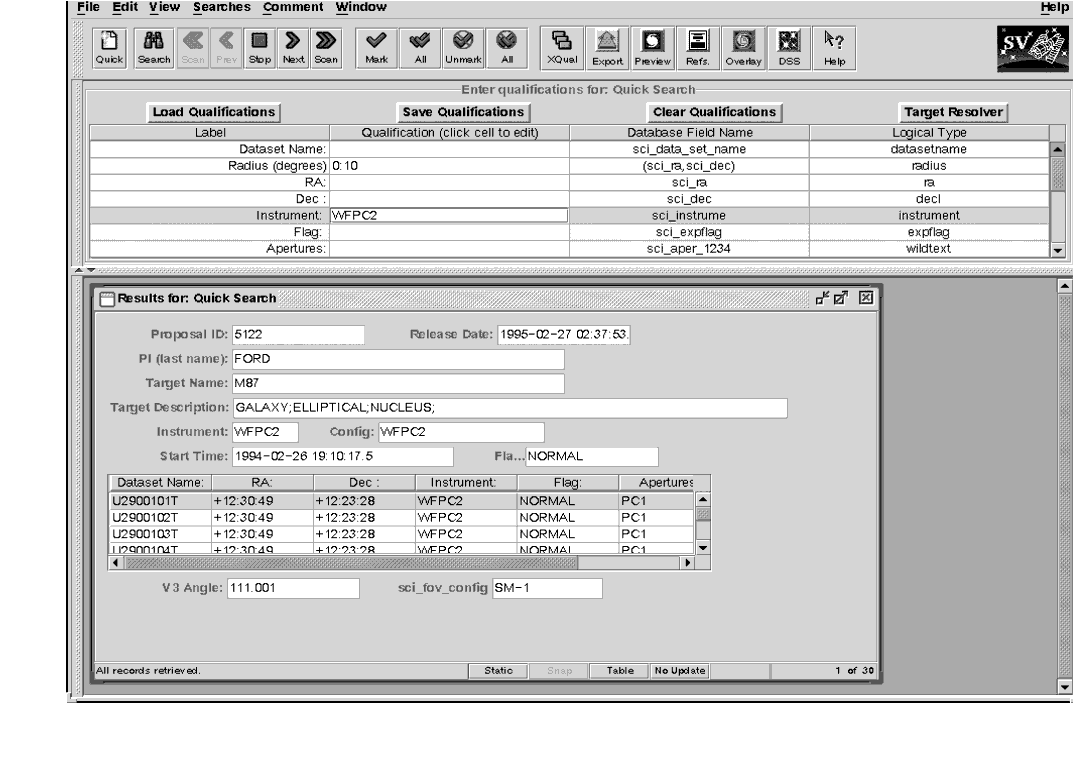
Clicking on a given dataset in the Results table will display the information shown in the cells above it (Proposal ID, Release Date, P.I., etc.). You may browse through the retrieved datasets either by using the mouse and scroll bar, or by using the navigation buttons (Scan, Previous, Next) in the top row of mouse buttons. The Scan option will automatically step through all of the files retrieved in the search, provided that the right most button at the bottom of the Results window is toggled to "Update." If this button is toggled to "No Update," the Scan option will go straight to the end of the list of files.
The ability to obtain a preview is available for many, but not all, of the datasets in the HDA (e.g., previews are not available for many FOC datasets). This is done with the "Preview" button, if it is enabled. For images, this will display a re-sampled version of the image using the Java Image Preview Application (JIPA) tool that is part of StarView. For spectra, a simple GIF image of the calibrated spectrum will be displayed. JIPA and VTT can also display an image's FITS header, under the JIPA "Tools" menu. The JIPA preview of the WFPC2 image U2900103T retrieved in the previous search for WFPC2 images of M87 is shown in figure 1.2, along with the window displaying part of the FITS header file of this image.
Other display options with StarView include "DSS," which will display a 20' x 20' Digital Sky Survey image at the target coordinates, while the "Overlay" button will display the same DSS image with outlines of the HST instrument apertures at the target coordinates superimposed on it, at the orientation of the observation selected. The "References" button provides a link to any known published papers citing the dataset, as listed in ADS. Note that the HST images displayed by the Preview are of reduced quality compared to the actual data files, and cannot be downloaded. They are only meant to provide a quick check that the datasets found by the search met the search criteria, i.e., contained the object(s) of interest, and are of the desired quality.
Figure 1.2: JIPA preview of WFPC2 image U2900103T, along with image header file, using Preview option
1.2.3 Marking and Retrieving Data with StarView
Datasets are marked for retrieval by first clicking on them, then using the "Mark" button at the top of StarView. There is also the "All" button, which will mark all the datasets retrieved in the search. Marked datasets will be displayed in the Retrieval window. Datasets still within their proprietary period will be displayed in yellow, and users other than the proposal PI and those authorized by the PI will not able to retrieve them. The release date of files still within their proprietary period will also be indicated on the search results form.
If satisfied with the marked datasets, choose "Submit" in the Retrieval window to retrieve them. You will then be queried for both the type of data files associated with the dataset(s) to be retrieved, and for the method of delivery of these files. The options for type of file include files calibrated with the On-The-Fly-Recalibration (OTFR) pipeline for the WFPC2, NICMOS, STIS and ACS instruments. OTFR applies the best available calibration files (i.e., dark current and flat field images taken closest in time to the observations) to the uncalibrated data files. You may also request the uncalibrated (raw) files and calibration files separately. For some of the earlier instruments, e.g., WFPC and FOS, you may request both the calibration files actually applied to the images, as well as those that should provide the best calibration of them, if recalibration is desired. You may also request Data Quality and Observation Log files.
Options for data delivery include ftp transfer by the user from the HDA staging disk, automatic transfer from the HDA via the Internet to a directory specified by the user, and the mailing of tapes or disks. If Internet delivery is specified, you will be queried for the name of the computer and directory in which the files are to be placed, as well as your user name and password on that computer (these requests are encrypted, so there is no danger of your login information being stolen). Upon final submission of the request, you will receive an e-mail message acknowledging its receipt, and another message after all the requested files have been transferred. The status of the request, i.e., how many files have been transferred and any errors that have occurred, can be checked on a Web page that will be given in the acknowledgment message.
1.2.4 Using StarView to Retrieve Calibration Files and Proposal Information
StarView allows several additional types of searches of the HDA besides the Quick Search option described above. These can be selected from the Searches menu bar at the top of the StarView screen. One such search option is by instrument. This is necessary for identifying calibration reference files. As an example, selecting the option "WFPC2 OTFR" under the Instrument and WFPC2 sub-menus of the Searches menu, and then entering "M87" under Target Name in the qualifications box, brings up the screen shown in figure 1.3. This screen shows all the calibration images and files applied by OTFR to the first file in the set of WFPC2 images of M87, as well as whether the application of these files was performed or omitted in the calibration pipeline. This is the same set of images found by the Quick Search query described above, and the same information for the other datasets from this search can be found using the Previous, Next and Scan buttons. Once these calibration images have been identified, further information on them can be obtained. For example, taking the name of the flat field file found in the above search and entering it into the "WFPC2 Calibration Data" Searches option will retrieve information on when and where this file was taken, and the date after which its use is recommended. This will help users decide if they would prefer to recalibrate their data using different files.
StarView can also be used to search for and view the abstracts of accepted HST proposals. Like the Preview capability of StarView, this provides additional information about a given dataset and whether it may be useful for your science goals. Viewing proposal abstracts is an option under the Searches menu, and an example is shown in figure 1.4. The Qualifications window again offers several parameters by which this search can be constrained, including proposal I.D. number, HST cycle, P.I. name, and combinations thereof. In the example shown only the proposal I.D. number was used.
Finally, StarView can be used during the Phase I proposal process to see whether or not HST observations of a given object or object class have already been made, or else are scheduled for execution. Specifically, the Duplications option under the Searches menu allows users to check a database containing both HDA files and a list of queued observations in order to see if a given object has been or will be observed. Similarly, under Duplications the user may also query the database of proposal abstracts for a given object or object class, to check for archived or scheduled observations.
1.2.5 Advanced Features of StarView
In addition to its basic search and retrieval function, StarView allows users to cross-qualify results from separate searches of the HDA, and to export the results of searches to disk as ASCII files. These operations are performed with the "XQual" and "Export" buttons, respectively. As an example of cross-qualification, a user might want to identify all the spiral galaxies for which both WFPC2 images and STIS spectra have been obtained. This could be accomplished with the Cross-Qualification feature by first doing two separate Quick Searches, in which these respective instruments are specified in the query box, and in which "Galaxy;Spiral" is typed in the Target Description box for both searches. Clicking the XQual button, specifying "Target Name" as the common field in the two sets of search results (as shown in figure 1.5), and clicking the "X-Qualify" button then identifies the galaxies occurring in both lists. StarView then places these galaxy names in the Target Name box of a new Quick Search window. Clicking the Search button with "WFPC2,STIS" entered for Instrument then gives a list of all the WFPC2 and STIS datasets for these galaxies. The Cross-Qualification function can also be performed on the files produced by the Export feature.
Figure 1.3: Results of StarView search for WFPC2 OTFR calibration files for M87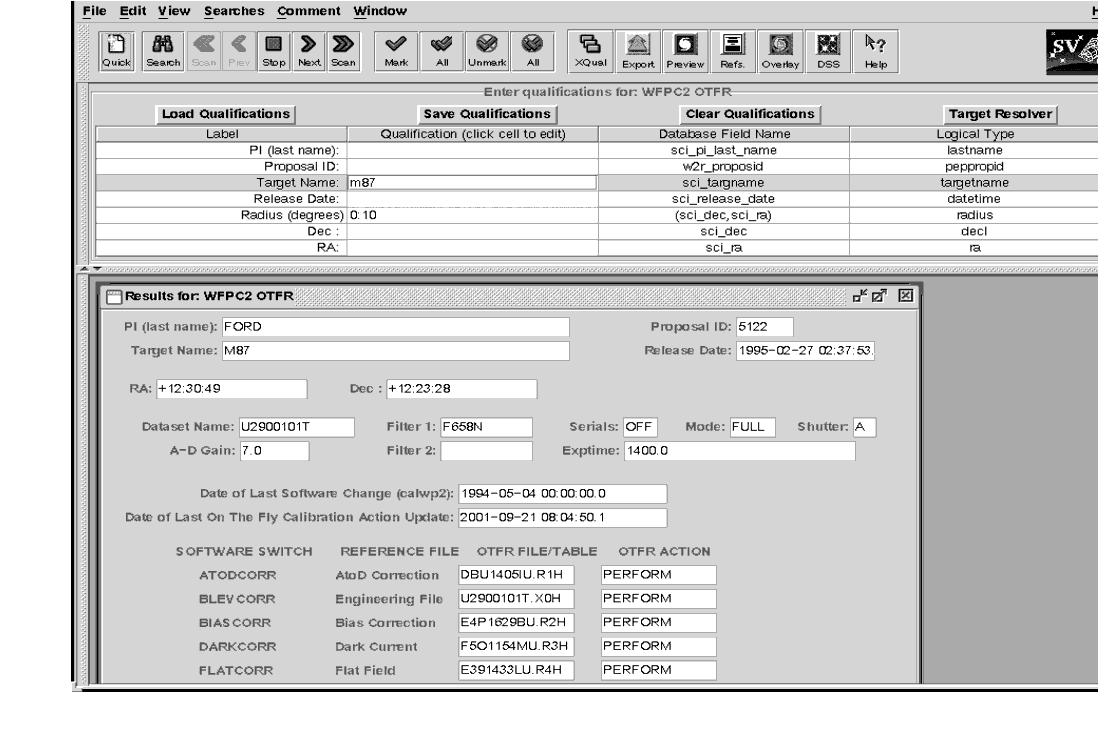
Figure 1.4: Results of the StarView search for the abstract of Proposal 8725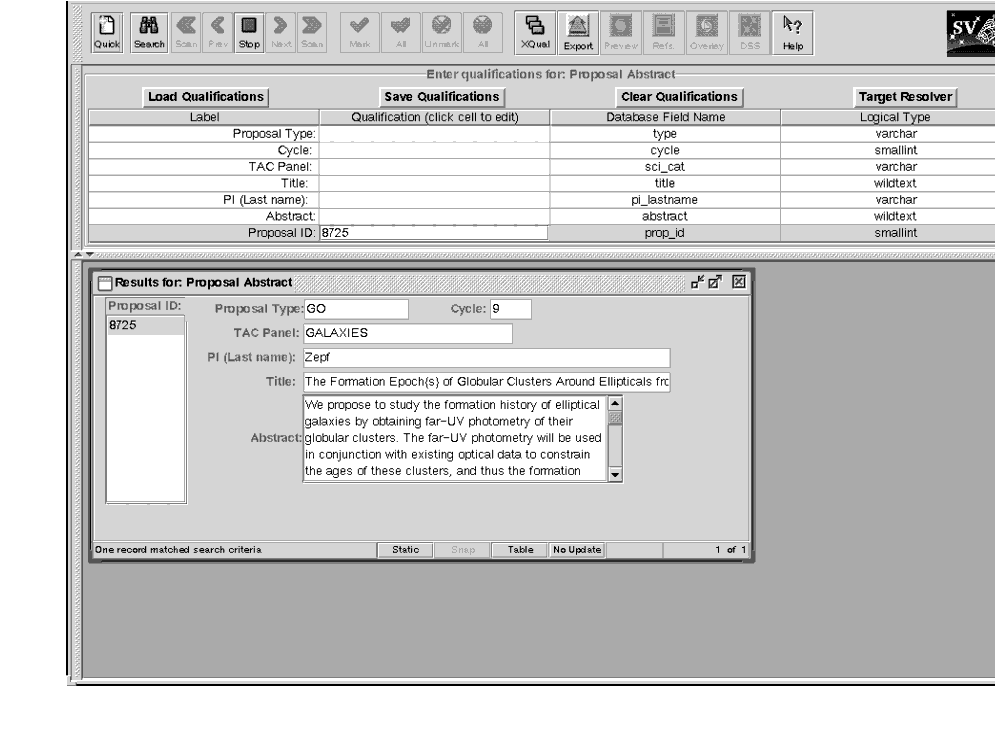
Figure 1.5: Example of Cross Correlation Feature, in which Target Name has been chosen as the common feature to search for in two Quick Search result lists.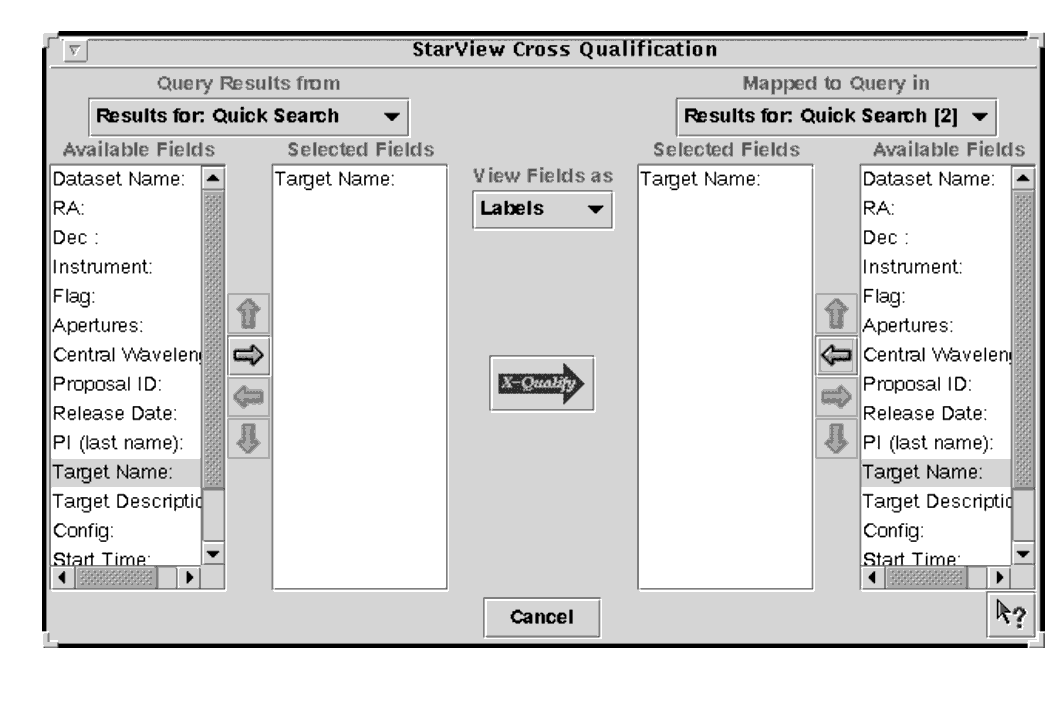
1.2.6 StarView and the Visual Target Tuner
The Visual Target Tuner (VTT) is part of the Astronomer's Proposal Tool (APT) package, which has been created to aid astronomers in planning their HST observations during the Phase I and Phase II proposal stages (see
http://apt.stsci.edu). VTT is an image display tool which allows the user to display DSS images or local FITS images with proper World Coordinate System keywords in the headers. It offers more features than JIPA, which is the default StarView display tool. However, for a limited number of operating systems, the VTT can be used with StarView. VTT offers the particular advantage that it can overlay the instrument apertures of multiple observations on a single DSS image. Clicking on these apertures will also highlight the associated datasets in StarView.Currently, to combine StarView and VTT requires downloading and installing APT from the above Web site. APT is only available for those operating systems with the Java Virtual Machine 1.3 (JVM 1.3). You can download the StarView/VTT package with JVM 1.3 included (a large download), or if you already have JVM 1.3 installed, you can get the smaller APT/VTT package. To make StarView use VTT, you must change your Viewer options from JIPA to VTT. Go to the Environment sub-menu of Edit in StarView, and change JIPA to VTT in the Viewers section. If VTT is not listed here, you should reinstall the two programs. Following this change, the Preview, DSS and Overlay buttons of StarView should all bring up VTT.
Once VTT has been installed, you can also bring up StarView from it. Enter in to StarView mode by clicking on the StarView button in the lower left hand menu of VTT. Clicking on a DSS image will then spawn a Quick StarView screen with the R.A. and Dec of the position you clicked loaded into the search fields. You can enter other constraints into these fields as usual. Search results can be displayed on the VTT screen by selecting the results in StarView, and pressing the Overlay button.
1.2.7 Quick Data Retrieval with StarView
The following steps summarize the basic process that PIs need to go through to retrieve their data with StarView. These steps follow registration as a MAST user, notification from STScI that the observations for a given proposal are complete, and providing StarView with your e-mail information. They are intended as a quick reference for this process.
- Start StarView.
- Click the "Quick" button.
- Enter your PI name and/or proposal ID number in the appropriate cell.
- Click the "Search" button.
- Use the "Scan" button to step through the retrieved files, after toggling the right most button at the bottom of the Results window to "Update," to verify that all datasets have been retrieved.
- Preview some or all of the datasets if desired, to verify data quality and target acquisition.
- Click "All" to mark all datasets for retrieval, or "Mark" to mark individual datasets for retrieval.
- Click "Submit" in the window that will be spawned by marking the files.
- Enter your MAST username and password and specify the means of data delivery. StarView remembers your name and password from past searches so it does not have to be entered each time.
- Click "Done", and your data are on their way. You will receive an e-mail message when your retrieval has been queued, and another when the transfer is complete.
|
Space Telescope Science Institute http://www.stsci.edu Voice: (410) 338-1082 help@stsci.edu |